
What is the WebSocket technology?
WebSocket is a protocol that provides full-duplex communication between the client and the server. WebSocket, when connecting to the target server, uses a rather unique function – changing the protocol through its upgrade. This way the HTTP protocol is replaced with WebSocket. Beginning this type of communication requires two steps1.
Course of the handshake In this step, the client sends a request and must receive an answer from the server as a confirmation of the start of communication Data transfer After a successful handshake, the client and server can exchange data with each other where a message composed of one or more data frames will be the unit of this communication GET /chat HTTP/1.1
Host: server.example.com
Upgrade: websocket
Connection: Upgrade
Sec-WebSocket-Key: dGhlIHNhbXBsZSBub25jZQ==
Origin: http://example.com
Sec-WebSocket-Protocol: chat, superchat
Sec-WebSocket-Version: 13
Listing 1. Headers handshake initiated by the client
HTTP/1.1 101 Switching Protocols
Upgrade: websocket
Connection: Upgrade
Sec-WebSocket-Accept: s3pPLMBiTxaQ9kYGzzhZRbK+xOo=
Sec-WebSocket-Protocol: chat
Listing 2. Server’s response to the query
We use the WebSocket API2 implementation for web browser clients. Due to the limited functionality of the base class, it is worth considering the AutobahnJS3 library. Additional functionality is the implementation of The Web Application Messaging Protocol (WAMP) standard, which brings a significant contribution to the operation of WebSockets. An example connection established at the browser side looks like this:
// for AUTOBAHNJS_VERSION="0.7.1" var session = new ab.Session( "ws://127.0.0.1:8080", function () { // connected $.event.trigger(Phpe.WS.CONNECTED); } function () { // disconected from websocket }, { 'skipSubprotocolCheck': true, 'maxRetries': 60, 'retryDelay': 2000 } );
Listing 3. Initiating connection with a WebSocket server
What is WAMP and why do I need another standard?
WAMP is an open standard of a WebSocket subprotocol. Its main task is to define two major functional enhancements in a single, unified protocol. The first addition is to provide support of remotely triggered RPC procedures ( Remote Procedure Calls), and the second is the support of the publisher – subscriber pattern.
Anyone who has worked with SOAP ( Simple Object Access Protocol) knows how useful it is to provide the ability to call and define functions provided by the server. The second addition basically doesn’t need an introduction, as it is currently the most widely used design pattern that allows for handling events. In short, you get the ability for any number of subscribers who follow specified publishers to track changes. Both the publisher and the subscriber can transmit/receive on different channels which make it possible for the separation logic to be used.
Going back to the discussed application, the server, after receiving information about the change in the data model, would be able to send appropriate messages to its subscribers – clients implemented in JavaScript. This way, the frontend of the application will know what the backend did. The reversed process is also possible. The time needed to achieve this goal is considerably shorter compared to traditional queries of REST API4
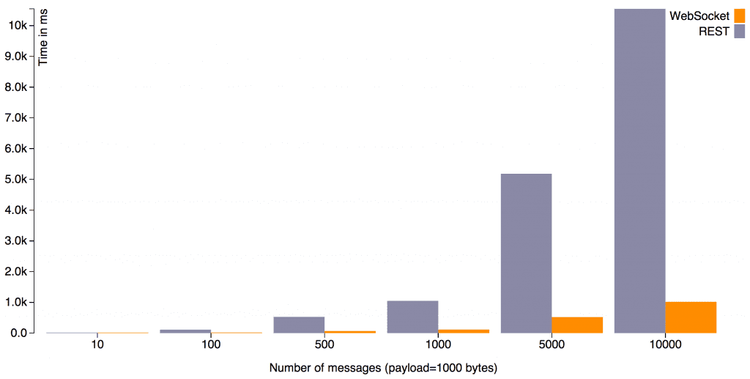
Fig. 2. Comparison of processing of fixed size messages between REST API and WebSocket.
The above example clearly shows the advantages of using WebSockets, especially in the case of a considerable exchange of messages. At the level of 10000 messages the difference is more than 10-fold.
We implement our own WS server.
There is a relatively small number of WebSocket servers available for PHP. This does not mean, however, that they don’t fulfill their function. One of the most popular, according to the http://github.com website, is RatchetPHP5. It has a fairly transparent documentation, so you can easily start your own server implementation.
$server = new RatchetApp(‚localhost’); $server->route(‚/’, new BasicPubSub); $server->run(); // BasicPubSub.php use RatchetConnectionInterface as Conn; class BasicPubSub implements RatchetWampWampServerInterface { public function onPublish(Conn $conn, $topic, $event, array $exclude, array $eligible) { $topic->broadcast($event); } public function onCall(Conn $conn, $id, $topic, array $params) { $conn->callError($id, $topic, 'RPC is not supported'); } public function onSubscribe(Conn $conn, $topic) {} public function onUnSubscribe(Conn $conn, $topic) {} public function onOpen(Conn $conn) {} public function onClose(Conn $conn) {} public function onError(Conn $conn, Exception $e) {} }
Listing 4. We implement our own WS server
php server.php
In short, this is how the implementation of the simplest server which uses the WAMP subprotocol looks like. You do not have to worry about controlling subscribers because it is performed by a dedicated TopicManager class when initiating connections. There is, however, one problem associated with RatchetPHP.
It is lacking the implementation of the WAMP 2.0 subprotocol which is necessary for the operation of the latest version of theAutobahnJS client library. Fortunately, thanks to David Dan, another WebSocket server/client called Thruway6 has been released. It implements both the basic functions of WAMP 2.0 and the advanced profile7. This library uses RatchetPHP as the transport logic in its classes.
Use of WebSockets in the project.
Sometimes, despite the best intentions, rewriting existing code to support WebSocket services is impossible. This was also the case with regard to the project that has been discussed in the introduction. So far, everything was handled solely by means of AJAX queries, the goal of which was to block forms. Over time the number of queries to the server started to be a big problem for the functioning of the application. Performance of this solution left much to be desired. At that point WebSockets got the green light and I, curious of the effects, started implementing the solution. Each server written using RatchetPHP allows for handling events according to the following interface.
interface WampServerInterface extends ComponentInterface { function onCall(ConnectionInterface $conn, $id, $topic, array $params); function onSubscribe(ConnectionInterface $conn, $topic); function onUnSubscribe(ConnectionInterface $conn, $topic); function onPublish(ConnectionInterface $conn, $topic, $event, array $exclude, array $eligible); }
Listing 5. Base interface for all servers based on RatchetPHP
As you can see in Listing 5, there are four major events for which we must define the logic. onSubscribe is a method called when a given client subscribes to a channel/topic. In accordance with the nomenclature suggested by the WAMP specification, it is worth creating a specific namespace. For example, it may be compliant with the application’s domain – com.example.form.example.1. This means that the server has connected the client to the form resource named example, representing entities from the table example, ID number 1. This is a gross oversimplification, but it turns out to be fully functional. First, you need to create subscription logic (see Listing 6).
class FormLockServer interface WampServerInterface { protected $formsLocked; public function onSubscribe(ConnectionInterface $conn, $topic) { $topicId = $payload->getId(); $conn->event($topic, array( 'status' => self::STATUS_FORM_SUBSCRIBED )); if (!empty($this->formsLocked[$topic])) { $conn->event($form, array( "status" => self::STATUS_FORM_LOCKED )); } } }
Listing 6. Handling subscription for WebSockets
This implementation is very simple and has been expanded in subsequent iterations. However, it meets the basic assumptions using simple structures. Information about subscribers are added automatically as part of the base functionality, additionally an immediate response for every client connected to a form that is already locked was implemented- $conn> event ($ form, array (‘status’ => self:: STATUS_FORM_LOCKED)); . onCall is a major hub defining available methods. In the case of the original WAMP 1.0 specification it is sufficient to delegate the appropriate function based on $id function id and its arguments. It is easiest to define it as in the following listing.
public function onCall(ConnectionInterface $conn, $id, $topic, array $params) { if ("form-lock" === $id) { if (empty($params['form'])) { return $conn->callError($id, "You need to provide valid form id"); } $form = $params['form']; if (!isset($this->formsLocked[$form])) { $this->formsLocked[$form] = $locker; $conn->callResult($id, ['event' => self::STATUS_FORM_LOCK]); // exclude caller connection from broadcast $topic->broadcast(["status" => self::STATUS_FORM_EDIT], [$conn]); } else { $conn->callError($id, "Form was locked", [ 'form' => $form, 'status' => self::STATUS_FORM_LOCKED ]); } } else { $conn->callError($id, "Wrong method called"); } }
Listing 7 . Function call service for WebSockets
var Phpe.WS = { // unable to connect subscribeForm: function (formId) { this.session.subscribe(formId, $.proxy(this.subscribeEvent, this)); }, subscribeEvent: function (topic, payload) { var form = payload.form; switch (payload.status) { case Phpe.WS.FORM_LOCKED: // form marked during editing break; case Phpe.WS.FORM_RELEASED: // form marked green after editing complete break; } }, lockForm: function (formId) { return this.session.call('form-lock', { form: formId }); }, initEvents: function () { $(document).on('click', '.form-lock', $.proxy(this.formLockEvent, this)); }, formLockEvent: function (e) { e.preventDefault(); var formId = $(e.currentTarget).closest('form').attr('id'); this.lockForm(formId).then($.proxy(this.formEditEvent, this)); }, formEditEvent: function () { // form has been locked - user can start job, e.g. unlock the form for editing } };
Listing 8. Handling of events initiated by WebSockets at the browser side (JavaScript)
At this point, one can get the impression that the functionality of the server is complete. According to the presented code there are three instructions for controlling the flow of data. $Topic> broadcast sends messages to all subscribers. The second argument of the function allows for the exclusion of theinitiating call from the subscribers group. On the other hand, the callResult connection method allows for replying to the connection to the server which initializes the formlock procedure. The $conn >callError instruction allows you to send an error signal for the initiating connection. After testing the new solution and the initial success, it turned out that there’s another problem that can not be solved by the WebSockets on their own. The aim of the blockade is to prevent conflicts of data so this objective has been partially solved but we have to remember to refresh the form after saving the entity in the base. We cannot assume that each lock release means an actual change in the form – because the users can always change their mind.
In the face of a new problem, it was necessary to ensure the possibility of communication between the backend, WebSockets and frontend. Using the ZeroMQ queue it is possible to add an additional event resulting from the placement of the element on the stack. This way backend sends a message to the queue, the signal is forwarded to WebSockets that can relay this information to the subscribers. The next step could be forcing the form to overload using AJAX. On the other hand, we can send the object with the new representation of the form’s data and replace contents.
// new zmq integrated server $loop = ReactEventLoopFactory::create(); $pusher = new FormLockServer; $context = new ReactZMQContext($loop); $pull = $context->getSocket(ZMQ::SOCKET_PULL); $pull->bind('tcp://127.0.0.1:5555'); $pull->on('message', array($pusher, 'onQueueAdded')); $webSock = new ReactSocketServer($loop); $webSock->listen(8080, '127.0.0.1'); $webServer = new RatchetServerIoServer( new RatchetHttpHttpServer( new RatchetWebSocketWsServer( new RatchetWampWampServer( $pusher ) ) ), $webSock ); $loop->run();
Listing 9. Addition of ZMQ queue service
// FormLockServer.php protected $subscribedTopics = array(); public function onSubscribe(ConnectionInterface $conn, $topic) { $this->subscribedTopics[$topic->getId()] = $topic; } public function onQueueAdded($entry) { $entryData = json_decode($entry, true); $topic = $this->subscribedTopics[$entryData['form']]; $topic->broadcast($entryData); }
Listing 10. Adding an event handler for the receipt of data to the queue
The above code adds support for ZMQ queue. According to the implementation, after an event is received, the onQueueAdded method which decodes the message into the form of an associative array is run. Then we find the transmission channel associated with the message with a list of subscribers to which the object that represents a change in the form can now be sent.
To add the message to the queue, the following code has to be run at the backend:
$context = new ZMQContext(); $socket = $context->getSocket(ZMQ::SOCKET_PUSH, 'websocket_pusher'); $socket->connect('tcp://127.0.0.1:5555'); $socket->send($payloadAsJSON);
Listing 11. Connecting and sending message to the ZMQ queue
And where is Symfony in all this?
The code presented until now was 100% framework agnostic so it didn’t require any framework to work. There are, however, some elements that should be mentioned which will be a great area for refactoring and improving the application’s quality, especially when Symfony will be used for this purpose. Firstly, the application server will run as a background process. It is an application running in the console, thus, nothing will suit this purpose better than the SymfonyConsole component. This way it is possible to parameterize the server’s configuration.
use SymfonyBundleFrameworkBundleCommandContainerAwareCommand; use SymfonyComponentConsoleEventConsoleTerminateEvent; use SymfonyComponentConsoleInputInputArgument; use SymfonyComponentConsoleInputInputInterface; use SymfonyComponentConsoleInputInputOption; use SymfonyComponentConsoleOutputOutputInterface; use PhpeWebSocketBundleServerServer; class ServerRunCommand extends ContainerAwareCommand { protected $ipAddressDefault; protected $portDefault; /** * @var Server */ protected $server; /** * @param Server $server * @return $this */ public function setServer(Server $server) { $this->server = $server; return $this; } protected function configure() { $defaultPID = getenv('HOME') . '/websocket.pid'; $this->setName('websocket:run') ->setDescription('Run WebSocket Server') ->addArgument('ipAddress', InputArgument::OPTIONAL, 'Server Ip address') ->addArgument('port', InputArgument::OPTIONAL, 'Server port') ->addOption('pid', null, InputOption::VALUE_OPTIONAL, 'PID file location', $defaultPID) ; } }
Listing 12. Server’s runtime command
The above implementation adds an additional websocket:run command to the app/console commands. Using the command line arguments we can determine individually for the server the address and port under which it will be available. This especially makes the work of administrators easier as they don’t need to search through the configuration files of the project. The PID (Process IDentifier) file is another facilitation which creates an entry with the current process number for the running server process. It is a very convenient solution because the administrator doesn’t need to know the process number, he can simply use the aforementioned file located at a specified location. This is particularly useful for automated application deployment, where, in order to update the server files it is necessary to first stop the current server process.
namespace PhpeWebsocketBundle; use PhpeWebsocketBundleDependencyInjectionApplicationCompilerPass; use SymfonyComponentDependencyInjectionContainerBuilder; use SymfonyComponentHttpKernelBundleBundle; class PhpeWebsocketBundle extends Bundle { public function build(ContainerBuilder $container) { parent::build($container); $container->addCompilerPass(new ApplicationCompilerPass()); } }
Listing 13. Addition of the tagging logic before the container compilation
namespace PhpeWebsocketBundleDependencyInjection; use SymfonyComponentDependencyInjectionCompilerCompilerPassInterface; use SymfonyComponentDependencyInjectionContainerBuilder; use SymfonyComponentDependencyInjectionReference; class ApplicationCompilerPass implements CompilerPassInterface { public function process(ContainerBuilder $container) { if ($container->hasDefinition('phpe_ws.application_manager')) { $definition = $container->getDefinition('phpe_ws.application_manager'); foreach ($container->findTaggedServiceIds('phpe_ws.application') as $id => $attributes) { $definition->addMethodCall('add', array(new Reference($id))); } } } }
Listing 14. Addition of tagged services to the manager service
namespace PhpeWebsocketBundleManager; use PhpeWebsocketBundleApplicationApplicationInterface; class ApplicationManager implements ApplicationManagerInterface { /** * @var SplObjectStorage */ protected $applications; public function __construct() { $this->applications = new SplObjectStorage(); } /** * @param ApplicationInterface $application * @return $this|void */ public function add(ApplicationInterface $application) { $this->applications->attach($application); return $this; } /** * @return SplObjectStorage */ public function all() { return $this->applications; } }
Listing 15. Manager of the websock application.
namespace PhpeWebsocketBundleApplication; interface ApplicationInterface { public function setRoute($route); public function getRoute(); }
Listing 16. The application interface
<service id="phpe_ws.echo_application" class="PhpeWebsocketBundleApplicationEchoApplication"> <tag name="phpe_ws.application" /> <call method="setRoute"> <argument>/echo</argument> </call> </service>
Listing 17. Definition of a sample WebSocket application
Three classes that were listed above are an easy implementation of tagging and dynamically adding additional WebSocket services to the application. The first step is the creation of the implementation of the CompilerPassInterface interface. After registering it in a container for the $container> addCompilerPass (new ApplicationCompilerPass ()); bundle, it is possible to modify its services. This way you can detect the services that should be added to the ApplicationManager. The interface of each application is currently very simple; it contains only the information about the routing path associated with the application. This way you can share any WebSocket logic between various addresses. E.g. 127.0.0.1:8080/chat will be linked with the ChatApplication class, and /formslock with the FormLockApplication class. Of course, this still requires an appropriate server implementation which, in short, can look like below.
namespace PhpeWebsocketBundleServer; use RatchetApp; use PhpeWebsocketBundleManagerApplicationManagerInterface; class Server { protected $host; protected $port; protected $applicationManager; public function setApplicationManager(ApplicationManagerInterface $manager) { $this->applicationManager = $manager; } public function run() { $this->ratchet = new App($this->host, $this->port); foreach ($this->applicationManager->all() as $application) { $this->ratchet->route($application->getRoute(), $application); } $this->ratchet->run(); } }
Listing 18. Server class with the service of many applications stored by the manager
The next iteration of refactoring.
Preliminary WebSockets functionality has already been implemented on the Symfony side but we should not rest on our laurels but rather reap the full benefits of this framework. At the moment, since launching the server from the command line, WebSockets become a blackbox. We are not able to predict what’s happening inside which can make debugging the application difficult. Therefore, it’s worth using another component provided by Symfony which is its integration with Monolog. This is a library for creating logs of operations. After initial configuration of another dependency for our application, we can record changes within the application.
<service id="phpe_ws.echo_application" class="PhpeWebsocketBundleApplicationEchoApplication"> <tag name="phpe_ws.application" /> <call method="setRoute"> <argument>/echo</argument> </call> <call method="setLogger"> <argument id="logger" type="service" /> </call> </service>
Listing 19. Adding a new application to the DI container
Another change is related to streamlining and standardizing the way in which WebSocket receives changes on the backend side. Since the project uses DoctrineORM, it is possible to use the available events related to the current state of the UnitOfWork object. The postFlush event which, in accordance with the definition, is carried out after sending the changes to the database should be used for this purpose. Thus, we can be sure that the object is saved
<service id="phpe.ws.event_subscriber.entity_subscriber" class="PhpeWebsocketBundleEventSubscriberEntitySubscriber"> <argument type="service" id="phpe.ws.server.zmq_service" /> <tag name="doctrine.event_subscriber" /> </service>
Listing 20. Addition of the class listening to entity changes
namespace PhpeWebSocketBundleEventSubscriber; use DoctrineCommonEventSubscriber; use DoctrineORMEvents; use SymfonyComponentDependencyInjectionContainerInterface; use PhpeWebSocketBundleApplicationFormLock; use PhpeWebSocketBundleServerZMQServer; use PhpeWebSocketBundleEntityChannelProviderInterface; class EntitySubscriber implements EventSubscriber { protected $queue; protected $container; public function __construct(ZMQServer $queue) { $this->queue = $queue; } public function getSubscribedEvents() { return array( Events::postFlush, ); } public function setContainer(ContainerInterface $container) { $this->container = $container; } public function postFlush(OnFlushEventArgs $eventArgs) { $em = $eventArgs->getEntityManager(); $uow = $em->getUnitOfWork(); // Perform only for HTTP requests / Ignore CLI if ($this->container && !$this->container->isScopeActive('request')) { return; } foreach ($uow->getScheduledEntityUpdates() as $entity) { if ($entity instanceof ChannelProviderInterface) { $this->publishEvents( $entity, FormLock::STATUS_ENTITY_UPDATED, $uow->getEntityChangeSet($entity) ); } } } public function publishEvents(ChannelProviderInterface $entity, $status, $changeSet = null) { $payload = [ 'status' => $status, 'channel' => $entity->getChannelCode(), 'change_set' => $changeSet ]; $this->queue->send($payload); } } `
Listing 21. A class which captures changes and sends them to the ZMQ queue
To sum up, WebSockets are a powerful tool in the fight for powerful Internet applications. Moreover, they have been implemented in PHP. This is extremely important because this way the source code of the application is consistent and available within a single technology. I encourage everyone to try out the existing implementations in PHP and compare them with the AJAX technology. The benefits speak for themselves
On-demand webinar: Moving Forward From Legacy Systems
We’ll walk you through how to think about an upgrade, refactor, or migration project to your codebase. By the end of this webinar, you’ll have a step-by-step plan to move away from the legacy system.
Latest blog posts
Is Your E-commerce Business Ready for the European Accessibility Act?
Jun 16, 2025 by Janusz Toczko
Legacy Software and Security Risks: Why Regular Audits Are Your Best Defense
Jun 4, 2025 by Jerzy Zawadzki
Magento Enters the SaaS Arena: What Adobe Commerce as a Service Means for Your Business
Apr 24, 2025 by Jerzy Zawadzki
Ready to talk about your project?
Tell us more
Fill out a quick form describing your needs. You can always add details later on and we’ll reply within a day!
Strategic Planning
We go through recommended tools, technologies and frameworks that best fit the challenges you face.
Workshop Kickoff
Once we arrange the formalities, you can meet your Polcode team members and we’ll begin developing your next project.