
The idea of automated app testing has been discussed in multiple online and offline publications in many ways. When going from theory to practice, however, we often encounter issues—I, too, bumped into a few while developing an Ionic app. That’s why in this article, I share with you what I’ve learned and the solutions I’ve found.
How to Create Automated Application Testing in Ionic
The idea of automated app testing has been discussed in multiple online and offline publications in many ways. When going from theory to practice, however, we often encounter issues—I, too, bumped into a few while developing an Ionic app. That’s why in this article, I share with you what I’ve learned and the solutions I’ve found.
I’ve been writing automated tests before, both in backend and frontend apps. What I needed to do here, was to learn how to transform my experience to Ionic.
Before We Get Down to Business: The Basics
Ionic is based on Angular framework, and this article refers to its 5th edition.
#1 Necessary Tools
Before I managed to configure everything I needed to perform tests and generate a code coverage report, I spent a lot of time installing npm packets—sometimes older versions of the packets turned up errors. In the end, in my package.json file in the devDependencies, there was the following set of tools:
"@angular/cli": "1.4.8",
"@ionic/app-scripts": "3.1.10",
"@types/jasmine": "^2.5.41",
"@types/node": "^8.0.45",
"angular2-template-loader": "^0.6.2",
"html-loader": "^0.5.1",
"ionic-mocks": "^1.3.0",
"istanbul-instrumenter-loader": "^3.0.0",
"jasmine": "^3.1.0",
"jasmine-core": "^3.1.0",
"jasmine-spec-reporter": "^4.1.0",
"karma": "^1.5.0",
"karma-chrome-launcher": "^2.0.0",
"karma-coverage-istanbul-reporter": "^1.3.0",
"karma-jasmine": "^1.1.0",
"karma-jasmine-html-reporter": "^1.2.0",
"karma-sourcemap-loader": "^0.3.7",
"karma-webpack": "^2.0.3",
"null-loader": "^0.1.1",
"protractor": "^5.1.1",
"ts-loader": "^3.0.3",
"ts-node": "^3.0.2",
"typescript": "~2.6.2”
#2 Configuring the Project
To configure tests, you need to copy the test-config catalog from Ionic’s Github repository to your project, and then in the section “scripts” in the package.json file add:
package.json
"test": "karma start ./test-config/karma.conf.js"
Aside from that, you need to add all the packets from the earlier point to the section devDependencies in the package.json file, and then run the npm install command.
To make sure everything worked, run npm run test. Of course you don’t yet have any tests you could run, but the command will show you if everything was installed correctly and doesn’t turn up errors.
The tests configuration from the ionic-unit-testing-example repository assumes that your tests will be included in the files with the .spec.ts extension in the src/ catalogs. These tests are also called specification—the reason why spec is in the extension.
For example, in my project I have a catalog src/services/ and inside there are the following files:
air-pollution-service.spec.ts
air-pollution-service.ts
alerts-service.spec.ts
alerts-service.ts
api-service.spec.ts
api-service.ts
app-state.spec.ts
app-state.ts
config-service.spec.ts
config-service.ts
helper-service.spec.ts
helper-service.ts
services.module.ts
user-settings.spec.ts
user-settings.ts
As you can see, every service has its own .ts file and additionally a file with the .spec.ts extension.
Running the First Test
The most basic .spec.ts. file can look like this:
import {TestBed} from '@angular/core/testing';
import {IonicModule} from 'ionic-angular/index';
import {ConfigService} from "./config-service";

describe('ConfigService', () => {
    let configService: ConfigService;

    beforeEach(async(() => {
        TestBed.configureTestingModule({
            declarations: [],
            imports: [
                IonicModule.forRoot(ConfigService)
            ],
            providers: [
                ConfigService
            ]
        });
    }));

    beforeEach(() => {
        configService = TestBed.get(ConfigService);
    });

    it('should create service', () => expect(configService).toBeDefined());
});
This code checks if the service ConfigService was created. Aside from the specification included in the method it(), you also have:
- imports of necessary classes
- TestBed configuration
- creation of configService object
Note that lowercase configService is an object and capitalized ConfigService is a class.
In the next step, you can add another test to this file, which checks if the ConfigService class includes required public fields:
it ('contains required fields', () => {
    expect(configService.apiTokenSecret).toBeDefined();
    expect(configService.apiUrl).toBeDefined();
});
After running npm run test you should see that two tests were executed.
Introducing Faker into the Code
When testing if the code returns expected values, you can use expect($value).toBe(5), but the 5 sewn in place doesn’t look good, besides, it isn’t a reliable test. You can use faker’s library instead.
Faker gives you many methods to generate random data. To add it to your class of tests, you have to import it:
import * as faker from 'faker/locale/en_US';
In this case, you’re using English texts, date formats, etc. To change it, simply switch en_US to any value corresponding to the file name in the node_modules/faker/locale catalog.
From now on, you can use faker. The code should look like this:
expect($value).toBe(faker.random.number(50)); // random number from 0 to 50
The full list of faker methods can be found on the repository’s site You can find use cases in the catalog “examples” in this repository.
Using Mocks in App Testing
When performing tests, you often want a specific method or whole class to behave differently than in real conditions. For example, you don’t need the ApiService class to send a request to API but to only return a premade results (BTW, this is a good place to use faker). You’ll use mocks for that purpose.
Let’s say you have an app that calculates the CO2 emission from various means of transportation and collects data from API depending on the type of transportation. All API requests are sent in the ApiService and it’s where the method getAirPollutionParameters is as well. The collected data is used in the AirPollutionParameters in the method getParameters.
To test the method AirPollutionService.getParameters without sending real API requests, you have to create a mock of ApiService.getAirPollutionParameters method.
First, create the mock class:
class ApiServiceMock {
    public static instance(pollutionParameters: any) {
        let instance = jasmine.createSpyObj('ApiService', [
            'getAirPollutionParameters'
        ]);

        instance.getAirPollutionParameters.and.callFake((callback) => {
            callback(pollutionParameters);
        });

        return instance;
    }
}
The original method doesn’t return anything, but it executes a callback as an argument, adding emission data to it as a parameter. Your mock does the same thing, the difference being the source of data. Emission data in your mock is forwarded to the static method instance.
You have to inform TestBed that ApiServiceMock class will be used instead of ApiService. To do it, import both classes:
import {ApiService} from "./api-service";
import {ApiServiceMock} from "../mocks/api-service-mock";
In the “providers” in the TestBed configuration add:
{provide: ApiService, useFactory: () => ApiServiceForAirPollutionMock.instance(pollutionParameters)},
As you can see, you added the parameter pollutionParameters to the instance method. But the parameter hasn’t yet been created. Let’s create it and embed in the beginning of the test’s definition:
let pollutionParameters = {
    "rates":{
        "car":{
            "petrol":{
                "value": (1 + faker.random.number(50)) / 10,
                "per":"liter"
            },
            "diesel":{
                "value": (1 + faker.random.number(50)) / 10,
                "per":"liter"
            },
            "hybrid":{
                "value": (1 + faker.random.number(50)) / 100,
                "per":"kilometer"
            },
            "electric":{
                "value":0,
                "per":"kilometer"
            }
        },
        "train":{
            "value": (1 + faker.random.number(50)) / 100,
            "per":"kilometer"
        },
        "plane":{
            "value": (1 + faker.random.number(50)) / 100,
            "per":"kilometer"
        }
    }
};
Now you have an object that your mock will receive and return. When having such a mock, you can write a lot of tests where the code will describe the logic of your service.
The simplest one of them can look like this:
it ('should get air pollution parameters', fakeAsync(() => {
        let result = null;
        airPollutionService.getParameters((response) => result = response);
        flushMicrotasks();
        expect(result).toBe(pollutionParameters);
    })
);
This test initiates the method getParameters in the service AirPollutionService (an airPollutionService variable) and then declares the expected result which is the object you created previously.
The whole .spec.ts file looks like this:
import {fakeAsync, flushMicrotasks, TestBed} from '@angular/core/testing';
import {IonicModule} from 'ionic-angular/index';
import {AirPollution} from "./air-pollution-service";
import {ApiService} from "./api-service";
import {ApiServiceMock} from "../mocks/api-service-mock";
import * as faker from 'faker/locale/en_US';

describe('AirPollution', () => {
    let airPollution: AirPollution;
    let pollutionParameters = {
        "rates":{
            "car":{
                "petrol":{
                    "value": (1 + faker.random.number(50)) / 10,
                    "per":"liter"
                },
                "diesel":{
                    "value": (1 + faker.random.number(50)) / 10,
                    "per":"liter"
                },
                "hybrid":{
                    "value": (1 + faker.random.number(50)) / 100,
                    "per":"kilometer"
                },
                "electric":{
                    "value":0,
                    "per":"kilometer"
                }
            },
            "train":{
                "value": (1 + faker.random.number(50)) / 100,
                "per":"kilometer"
            },
            "plane":{
                "value": (1 + faker.random.number(50)) / 100,
                "per":"kilometer"
            }
        }
    };

    beforeEach(async(() => {
        TestBed.configureTestingModule({
            declarations: [],
            imports: [
                IonicModule.forRoot(AirPollution)
            ],
            providers: [
                {provide: ApiService, useFactory: () => ApiServiceMock.instance(pollutionParameters)},
                AirPollution
            ]
        });
    }));

    beforeEach(() => {
        airPollution = TestBed.get(AirPollution);
    });

    it ('should get air pollution parameters', fakeAsync(() => {
            let result = null;
            airPollution.getParameters((response) => result = response);
            flushMicrotasks();
            expect(result).toBe(pollutionParameters);
        })
    );

    // ... here there will be the remaining AirPollutionService tests
});
The above test additionally uses fakeAsync and flushMicrotasks which I’ll talk about in the next chapter.
Testing Promises
When the tested method uses asynchronous methods, the result won’t be returned instantly, so the below code won’t work:
airPollution.getParameters((response) => result = response);
expect(result).toBe(pollutionParameters);
It’s because asynchronous method AirPollutionService.getParameters uses ApiService.getAirPollutionParameters that in turn executes the code returning the promise. Luckily, Angular creators predicted this and gave us an easy way to conquer the hurdle.
All you have to do is include the definition of your test in the argument of the fakeAsync method and before declaring any expectations, insert the flushMicrotasks() method.
That’s enough not to worry whether the promise was fulfilled or if you still have to wait (I discourage you from using timeouts to wait).
Injecting HttpTestingController
Angular gives you ready-made mocks to test the HTTP client. They’re useful in pretty much any application that sends API requests. These are examples of a test that uses them:
import {async, inject, TestBed} from '@angular/core/testing';
import {IonicModule} from 'ionic-angular/index';
import {ApiService} from "./api-service";
import {ConfigService} from "./config-service";
import {HttpClientTestingModule, HttpTestingController} from '@angular/common/http/testing';
import {ServicesModule} from "./services.module";

describe('ApiService', () => {
    let apiService: ApiService;

    beforeEach(async(() => {
        TestBed.configureTestingModule({
            declarations: [],
            imports: [
                IonicModule.forRoot(ApiService),
                HttpClientTestingModule,
                ServicesModule
            ],
            providers: [
                ConfigService
            ]
        });
    }));

    beforeEach(() => {
        apiService = TestBed.get(ApiService);
    });

    it(
        'should create service',
        inject(
            [HttpTestingController],
            (
                http: HttpTestingController
            ) => {
                expect(apiService).toBeDefined()
            }
        )
    );
});
What changed here compared to other tests is the usage of inject method in the test’s definition. This method injects dependencies into the class constructor, in this case ApiService. As you can see in the code above, HttpTestingController was injected, which is a ready-made mock delivered by Angular.
Debugging Karma Tests in a Browser
After playing around with Ionic tests a little, you’ve probably noticed that after launching a test, a browser launches as well. On the page that pops up, there’s a “Debug” button.
Clicking the button opens a website where you can find information on what didn’t work during a particular test. These messages are a lot clearer than those in the console where you run npm run test.
Code Coverage
The command that tests package.json until now looked like that:
"test": "karma start ./test-config/karma.conf.js"
After inserting the coverage parameter, your tests will generate reports of code coverage. It’s a very useful tool for checking what hasn’t yet been tested.
The package.json looks will look like this after the change:
"test": "karma start ./test-config/karma.conf.js --coverage"
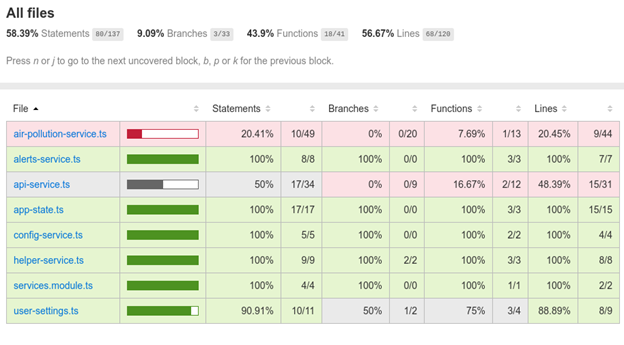
It’s only an example. In the applications we develop at Polcode, code coverage revolves around 100% 🙂
Automated software testing saves time and cuts costs. Automated tests can be endlessly reused, giving faster results and eliminating repetitive developer tasks. It’s a fast and efficient way to verify if an application works as expected. In case of future changes to the code, automated testing helps to check if a change negatively affects other app functionalities.
Polcode is an international full-cycle software house with over 1,300 completed projects. Propelled by passion and ambition, we’ve coded for over 800 businesses across the globe. If you share our passion and want to become a part of our team, contact our HR department. We’ll be happy to answer all your questions and even happier to welcome you aboard 🙂 Or maybe you have an interesting project in mind? If so, drop us an email and let’s talk over the details.
On-demand webinar: Moving Forward From Legacy Systems
We’ll walk you through how to think about an upgrade, refactor, or migration project to your codebase. By the end of this webinar, you’ll have a step-by-step plan to move away from the legacy system.
Latest blog posts
Ready to talk about your project?
Tell us more
Fill out a quick form describing your needs. You can always add details later on and we’ll reply within a day!
Strategic Planning
We go through recommended tools, technologies and frameworks that best fit the challenges you face.
Workshop Kickoff
Once we arrange the formalities, you can meet your Polcode team members and we’ll begin developing your next project.