It’s no secret that you can build amazing apps with Ionic. This post will cover how to easily get started and how to solve common challenges. When creating an application, the first decision boils down to choosing to build an APK for Android and/or IPA for iOS.
How To Build an Ionic Application with Ionic Hub
It’s no secret that you can build amazing apps with Ionic. This post will cover how to easily get started and how to solve common challenges. When creating an application, the first decision boils down to choosing to build an APK for Android and/or IPA for iOS.
There are several ways to begin, but for the sake of this article, let’s assume that we’re working on a Linux system, where XCode cannot be installed.
To build the application, we’ll use Appflow (available at ionicframework.com) provided by the creators of Ionic. The starter version of Appflow is free of charge, while other versions can be found on their pricing page: https://ionicframework.com/pricing#appflow.
Creating an App
From the Ionic Hub dashboard, you can do everything to build your app start to finish. The first step is to add the app to Ionic at https://dashboard.ionicframework.com/personal/apps. After selecting “Add app” there are two choices:
- Create a brand new app
- Connect an existing app with the Appflow tool
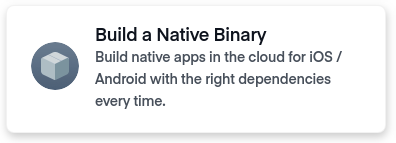
In the first case, we just need to enter the name of our app. In the second case, we’ll be shown instructions to connect an existing application. Either way, when the app is added, we’ll now see it on the dashboard, where “Build a Native Binary” must be selected.
The following prompt will appear:

The answer depends on whether or not we chose to add a new vs. existing app in the first step. In this example, “No, show me how” was selected.
Another prompt will appear, asking about your Ionic CLI client:

Once again “No, show me how” was selected for this example. (If you have the client already, you can click on “Yes” and skip the next paragraph). Following the instructions that are displayed on the page, let’s perform the following commands:
npm install -g ionic – installs Ionic console tool set
ionic start myApp tabs – creates a new Ionic project. It’s important to have it run in the appropriate directory where we want to have the application. If we want to create a completely empty application, we can replace the word “tabs” with “blank.” After executing the command, the necessary libraries will be downloaded. Once the action is completed, we can test our application in the browser. To do this, go to the newly created myApp directory and execute the command:ionic serve
Our application is now running in the browser, so we can end the ionic serve process with CTRL + C and move on.
The next command should be executed regardless of whether or not we created a new project or are building on an existing one:ionic link
Push App to Ionic Hub Appflow
Once the command is performed, a few questions will show up in the console:
? What would you like to do? (Use arrow keys)
❯ Link an existing app on Ionic Appflow
Create a new app on Ionic Appflow
We have already created the application on Ionic Hub, so choose the first answer.
? Which git host would you like to use? (Use arrow keys)
GitHub
❯ Ionic Appflow
We’ll choose Ionic Appflow for the host. Finally, the following information is returned:
> ionic config set id “acfa23d5” –json
[OK] id set to “acfa23d5”!
> ionic git remote
> git remote add ionic git@git.ionicjs.com:polcode/jktest.git
[OK] Added remote ionic.
[OK] Project linked with app acfa23d5!
From now on, we can push commits to the Ionic Hub app with the following command:
git push ionic – the first time this command is run, enter the branch name: `git push ionic master`, then just git push ionic.
Note that if our application has its git repository configured, we still can push to it using the “git push” command.
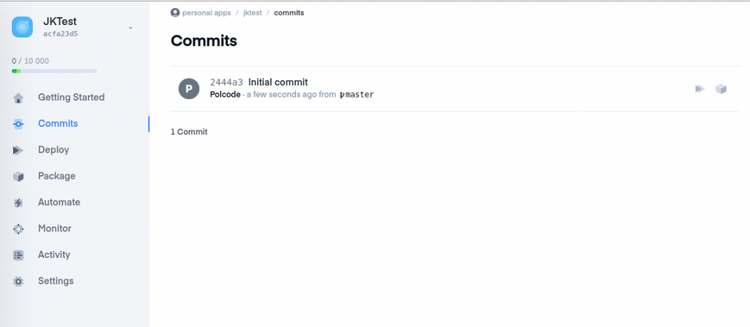
Commits
Once we have pushed our application, we should see the commit in the “Commits” section of Ionic Hub:
Deploy and create a build for your app
In the “Deploy” section take a look at the following screen:
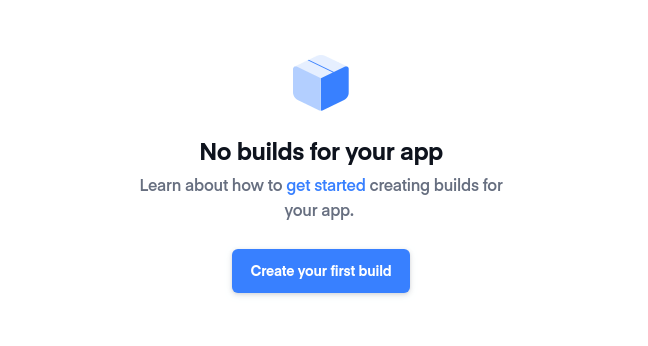
By choosing “Create your first build,” you’ll be prompted to create the build manually. However, a much more efficient solution is automation.
Create Automations for your App
In order to configure it, we want to move to the “Automate” section in Ionic Hub menu:
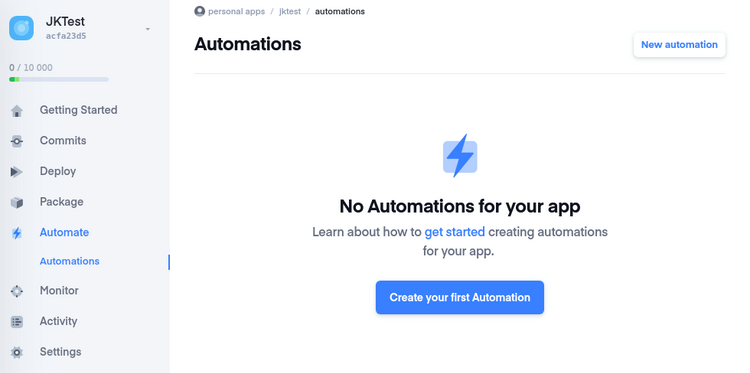
Choose “Create your first Automation” and the following form will appear:
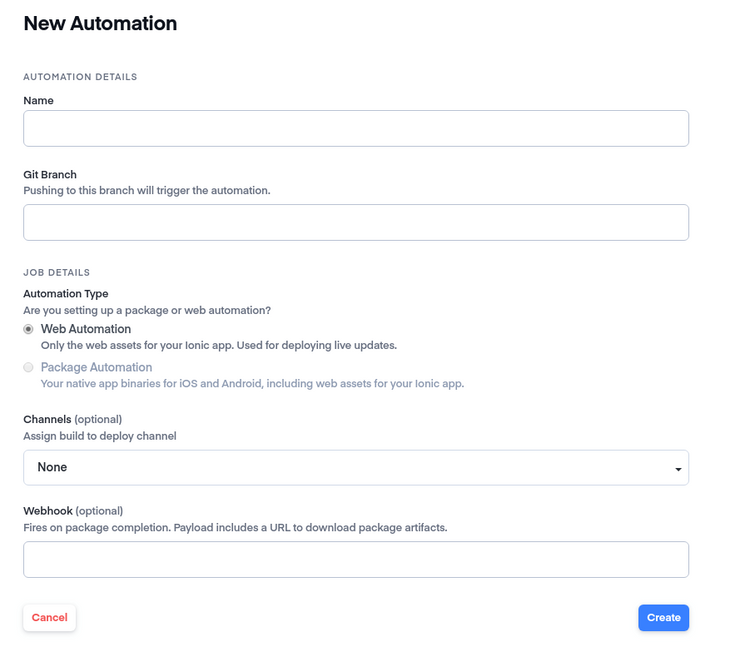
Name – enter any name of your choice, e.g. MyAutomation.
Git Branch – enter “master” or another branch if you want, leave the other fields unchanged and click “Create.”
From now on, after publishing any changes with the git push ionic command, the build will be done automatically. For instance, the author created the README.md file and sent a commit to Ionic Hub, which is now in the Deploy -> Builds section.
Builds in Progress
We can now see that the application is being built:
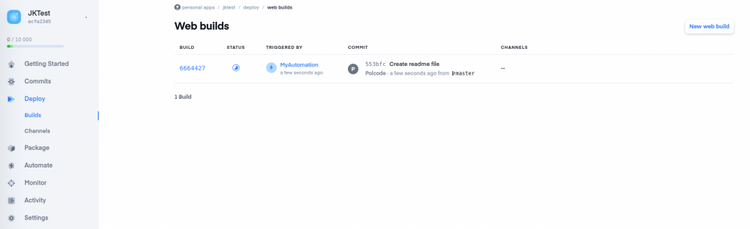
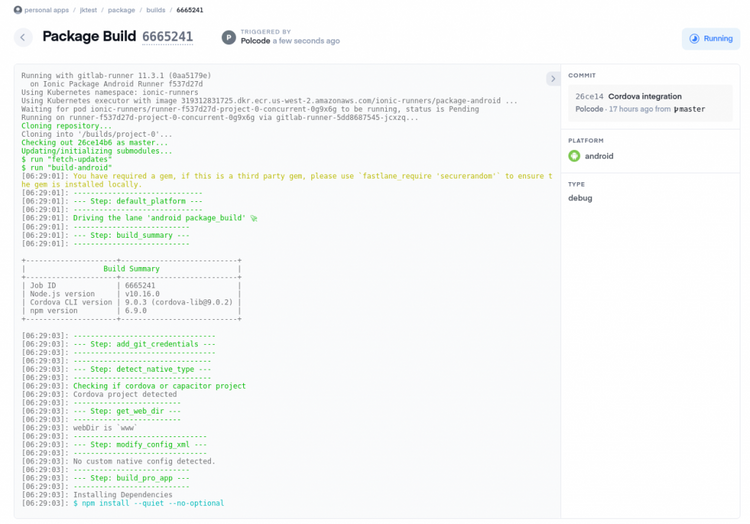
By clicking the number in the “BUILD” column, we can see the details of the building process:
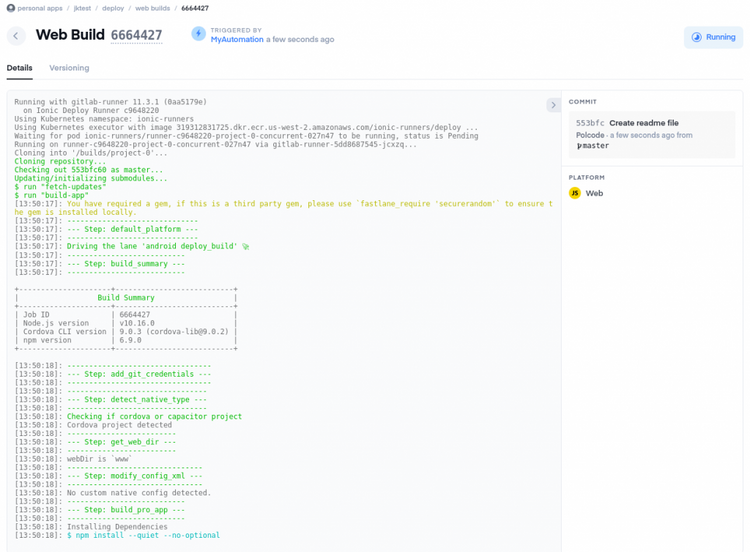
This page shows detailed logs regularly, so if we encounter any problems, we always have the opportunity to check out what’s happening. For example, this example build failed because Capacitor or Cordova was not installed:
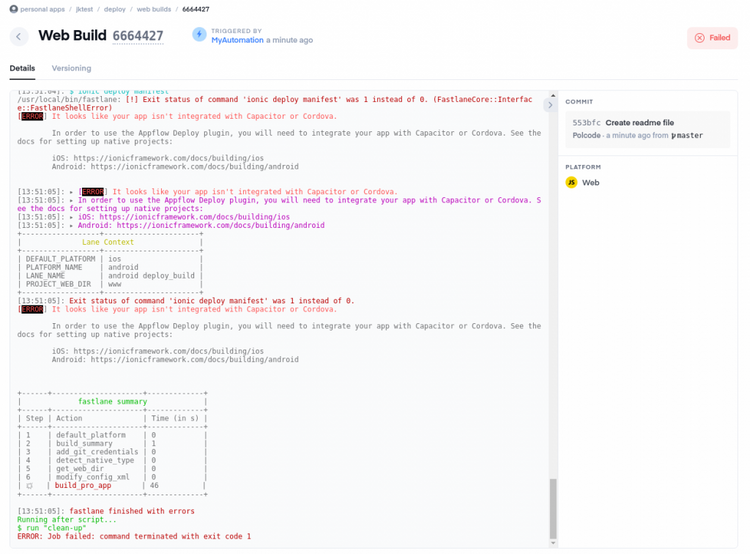
To fix the bug, I’ll add Cordova to the projects with:
ionic cordova platform
ionic cordova platform add android
ionic cordova platform add ios
When the changes are sent to Ionic Hub, the error will be resolved and you can see a successful build:
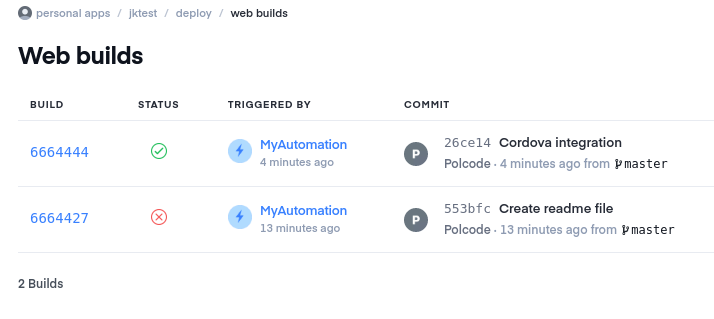
HINT: The “Web builds” page sometimes doesn’t refresh automatically, so if we see that our build stays in progress too long, try refreshing the page.
Application ID
The next important step is to assign our application ID, which can be set it in the config.xml file in the attribute “id” of the “<widget>” tag. By default, it is listed as “io.ionic.starter”, which we should replace with the unique app ID we’ve created.
The standard is to use domain notation (reverse domain name notation), using the format: com.mydomain.myapp. It is important that the identifier contains only letters, numbers and periods, because other characters may cause problems when distributing the application.
Certificates
Now we’ll create a package for Android/iOS. Before it can be done, we need to store the file, certificate and the .mobileprovision file. First, we will create development keys and certificates
Android
For Android, this comes down to generating a keystore command:
keytool -genkey -v -keystore MY-RELEASE-KEY.keystore -alias MY_ALIAS_NAME -keyalg RSA -keysize 2048 -validity 10000
In place of MY-RELEASE-KEY and MY_ALIAS_NAME, enter the name of our application (e.g. myapp). This command should be run in the directory where we want to store our keys, it should be a directory outside the project directory. IMPORTANT: Make sure you keep a copy of the keys, because you won’t be able to recover them if lost!
Another crucial thing is to enter the password for the keystore, as it must be re-entered after executing the command above. Additionally, the password should also be stored in a permanent and secure place. The next questions can be omitted by pressing ENTER each time, the only answer that has to be provided relates to accuracy of the data and “yes” must be selected:

After the command is completed, the keystore file will appear in the current directory. In our case, it’s under myapp.keystore. Later, it will get uploaded to Ionic Hub, but first the necessary files for iOS have to be created.
iOS
The procedure for iOS is a bit longer. Before proceeding, you should have already created an account at https://developer.apple.com if you have not done so yet.
Application registration ID
Go to https://developer.apple.com/account/resources/identifiers/list and click the plus icon to open a form:
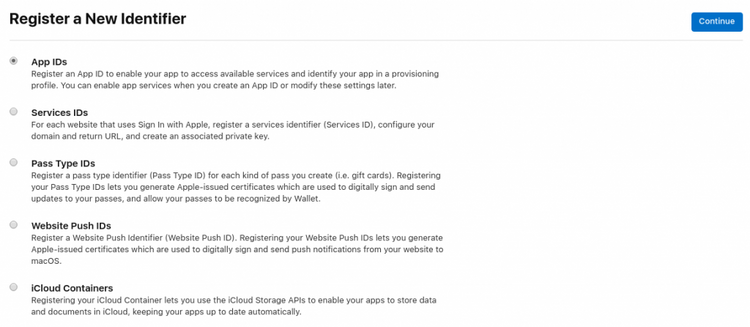
Choose “App IDs” and proceed. You will be taken to the next page with the following form:
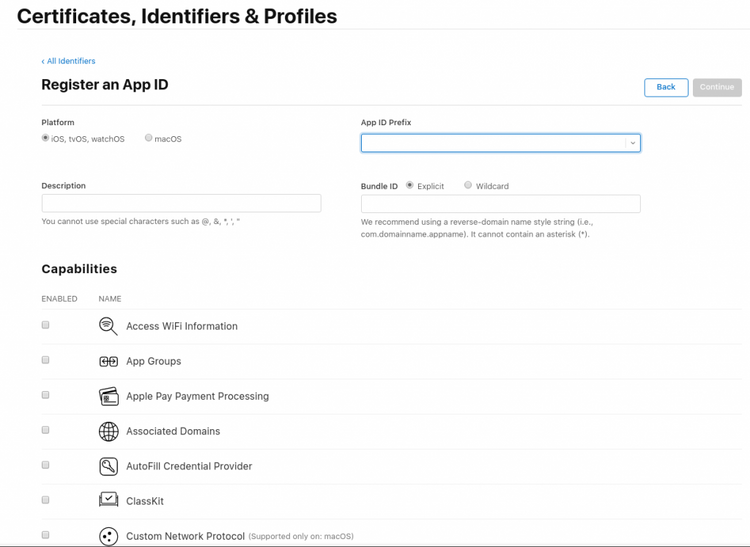
The most important step here is to enter the application ID in the Bundle ID field that is compatible with the contents of config.xml. Moving on, click “Register” and after a while, you will see your ID on the “Identifiers” list.
Device registration
The dev version of our application will only run on devices that are assigned to it. A device can be added by clicking the plus icon on the following page: https://developer.apple.com/account/resources/devices/list, which opens the form below:
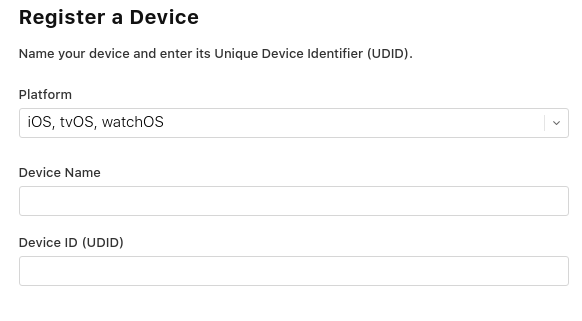
Choose a device name which will be visible only to you. You’ll also need to enter the UDID of your device. If you do not know your device’s UDID, you can use the following tool to find it: https://showmyudid.com/
Certificate Signing Request
The next step is to generate a “Certificate Signing Request,” the file that is required to generate the certificate. To do this, you’ll need to go back to the directory that includes the keys and perform the following commands:
openssl genrsa -out <KEY_NAME>.key 2048
openssl req -new -key <KEY_NAME>.key -out CertificateSigningRequest.certSigningRequest
We’ll replace KEY_NAME in both commands with the name of our application (myApp.key)
You’ll be asked for contact details, which you do not need to provide, but enter your password for “A challenge password,” when prompted.
Once completed, a CertificateSigningRequest.certSigningRequest file will be generated, which allows us to proceed to the certificate generation process.
Certificates
Clicking the plus (+) icon at
https://developer.apple.com/account/resources/certificates/list will open a new form for creating a new certificate:
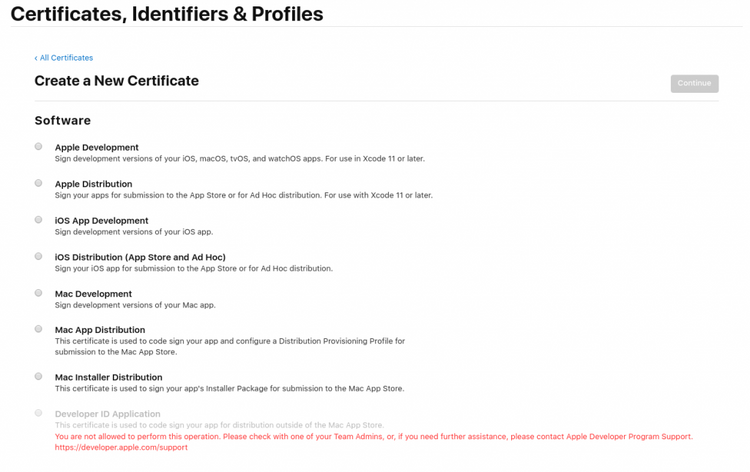
Select “iOS App Development” and click “Continue.”
“Upload a Certificate Signing Request” will be displayed and you can upload the CertificateSigningRequest.certSigningRequest file that we generated in the previous step.
On the next screen, you will also see a summary of your certificate and the “Download” button, which will download the file with the ios_development.cer certificate.
Now, we need to slightly modify the file so that we can change it into a .p12 file.
Perform the following commands:
openssl x509 -inform DER -outform PEM -in ios_development.cer -out ios_development.cer.pem
openssl pkcs12 -export -inkey keyname.key -in ios_development.cer.pem -out Certificates.p12
In the second of the above commands, we’ll provide the password, which will later be required in Ionic Hub.
Provisioning Profile
The last thing we need to do on the Apple Developer site is to generate a provisioning profile.
Go to https://developer.apple.com/account/resources/profiles/list, and click the plus (+) icon and proceed to register a new provisioning profile.
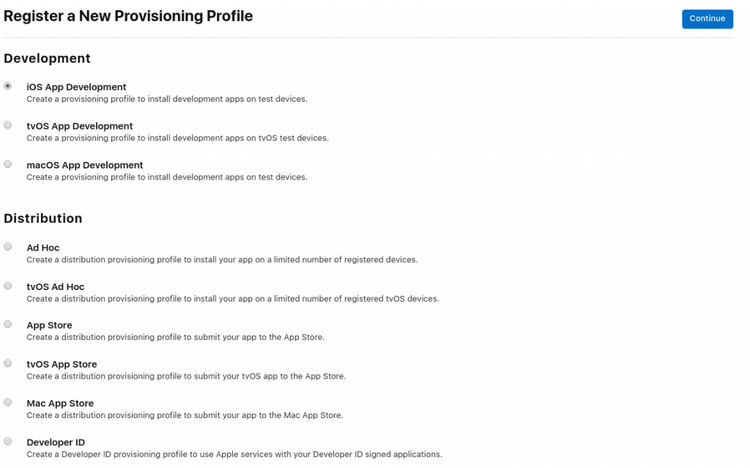
Let’s select “iOS App Development”, “Continue”, then on the “Select an App ID” page we’ll select our application ID from the drop-down list and click “Continue” once again.
On the next screen, select our certificate and move on to the next page. In the “Select Devices” screen, select the previously added devices on which the app will be tested, and proceed to the final step. You need to provide the name of our profile, e.g. MyProfile, and click “Generate”. Once this is completed, click Download and save the .mobileprovision file.
IMPORTANT: If you need to add more devices in the future to your application (dev version), you should do it in the “Devices” tab where it’s possible to edit them in the provisioning profile. You’ll need to select a new device, generate a new file, save it once more and only then you can upload it to Ionic Hub.
Uploading certificates in Ionic Hub
At this point, you should have all the necessary files (remember to make backup copies and to store passwords in a safe place), so you can go back to Ionic Hub.
In Ionic Hub, enter Package > Certificates, click “Add Profile” to provide a friendly name, e.g. MyAppDev. In the “type” field you need to select “Development” and click the “Create” button. Afterwards, you should see the following form:
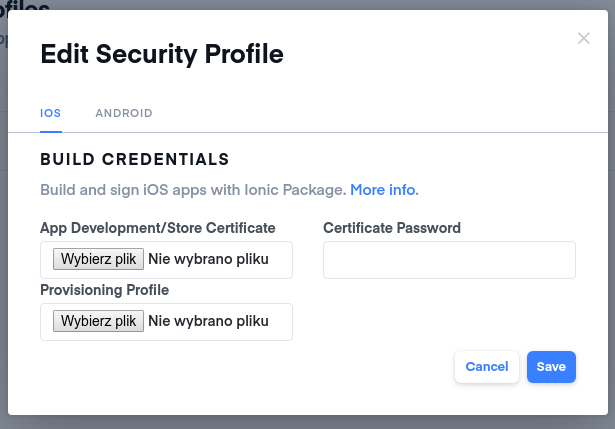
In the iOS tab, you’ll need to perform the following tasks:
- Upload the Certificates.p12 file in the “App Development/Store Certificate” field
- Upload the .mobileprovision file in the “Provisioning Profile
- Enter the password used for the certificate creation in the “Certificate Password” field
In the Android tab, you’ll need to do the following tasks:
- Upload the .keystore file in the “Keystore File” field
- Enter the alias identical with that given while creating keystore, e.g. MyApp, in the “Key Alias”field
- Enter the password used for the keystore creation in the “Keystore Password”
- Enter the password used for key generation in the “Key Password” field
If you’re worried about confusing passwords, you can use the same password for all instances. However, due to security reasons, it is better to provide varying passwords and save them with an appropriate notation—one that will allow us to differentiate them from one another.
Building ipa and apk packages
We can now move on to creating packages. To start, go to Package > Builds and choose “New Package Build.” In the next step, select a commit from which you would like to create a package and, choose the OS. For iOS go for “iOS – XCode 10” and for Android choose “Android.” In the “Build Type” field, select Development for iOS or Debug for Android. For iOS, remember to choose the Security Profile.
Click “Package Build” and you should see the following screen with info on package building:
If there are no errors in the process of building, you will see the “Download IPA” or “Download APK” button, depending on the selected OS. Finally, you can download and save the file on your machine.
Distribution in the dev version
Once the packages are ready, you can install them on your device and send them to the testers. To do so, we highly recommend the Diawi portal (https://www.diawi.com/). Once there, you’ll be prompted with the following form:
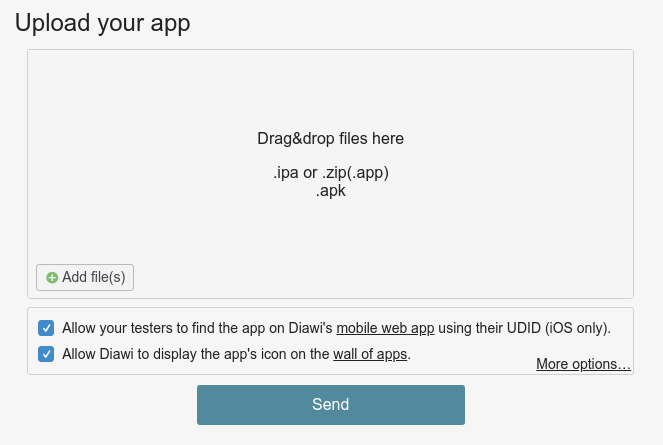
Drag your app to the “Drag & Drop files here” area, and uncheck both checkboxes at the bottom. Now, click “More options”. Here, you’ll need to provide the password that will be sent to the testers alongside the link to Diawi website. Alternatively, you can provide your address in the “Email” field to receive a message with the link.
When the app is uploaded to Diawi and the “Send” button is pushed, a site with a QR code will be displayed. The code can be scanned on a mobile device to enable app installation.

IMPORTANT: Sometimes the app does not run on Android and if you try to debug it, you can stumble upon logs regarding Play Protect. In order to avoid it, it is advisable to report our ID on the following website:
https://support.google.com/googleplay/android-developer/contact/protectappeals.
This is a one-time-only action.
What next?
At this point, we have configured everything needed to build applications in development mode. The process for a production build is quite similar, with the only key difference being that the Apple Developer certificate is generated by selecting “iOS Distribution (App Store and Ad Hoc)” instead of “iOS App Development, and also, when creating the Security Profile in Ionic Hub, select “Production” type.
The distribution of applications on Google Play and the App Store is quite a broad topic that lends itself to a separate article. The final thing to be stressed is that the .ipa file needs to be uploaded to App Store Connect with the AppLoader tool that works solely on Macs. Luckily enough, the Mac-In-Cloud service (https://www.macincloud.com/) is a helpful resource. It allows you to purchase access to a remote Mac. With the Pay-As-You-Go option, you pay only for the actual hours used. To upload the app we need just a few minutes, which means that the proposed solution is relatively inexpensive.
Summary
Though this process may seem a bit complicated at first, it gets significantly easier the more times you go through the process. As you continue to build applications, it will become much easier and you’ll be so familiar with each step that it becomes second nature.
Feel free to save the link to this article in your bookmarks so that it serves as a point of reference at any given time.
Thanks for reading!
On-demand webinar: Moving Forward From Legacy Systems
We’ll walk you through how to think about an upgrade, refactor, or migration project to your codebase. By the end of this webinar, you’ll have a step-by-step plan to move away from the legacy system.
Latest blog posts
Is Your E-commerce Business Ready for the European Accessibility Act?
Jun 16, 2025 by Janusz Toczko
Legacy Software and Security Risks: Why Regular Audits Are Your Best Defense
Jun 4, 2025 by Jerzy Zawadzki
Magento Enters the SaaS Arena: What Adobe Commerce as a Service Means for Your Business
Apr 24, 2025 by Jerzy Zawadzki
Ready to talk about your project?
Tell us more
Fill out a quick form describing your needs. You can always add details later on and we’ll reply within a day!
Strategic Planning
We go through recommended tools, technologies and frameworks that best fit the challenges you face.
Workshop Kickoff
Once we arrange the formalities, you can meet your Polcode team members and we’ll begin developing your next project.